Take a look at these 4 tips drawn from Shapeways’ Pre-Print Checklist. We hope that they’ll give you confidence to bring more products to life through Shapeways.
- Always keep your material in mind
Each of our materials has unique design guidelines to ensure reliable 3D printing. If you want to experiment outside these established minimums, you can try our “Print It Anyway” pilot program when you design for certain materials. - Check wall & wire thickness
Every part of your model must be thick enough to be 3D printed, survive post-production, and be safely packed and shipped. Use our automated Wall Thickness Tool to check for areas that may be too thin. You can access this tool from the Model Edit page at any time. Learn more about why wall thickness matters. - Create escape holes for hollow models
Excess material, such as nylon powder for our Strong & Flexible Plastic, must be able to escape from hollow models. The material guidelines describe the required escape holes for each material—when in doubt, lean towards more and larger escape holes. - Check balance and weight
A model must be designed for real-world physics. Account for weight distribution and the model’s ability to support its own weight. - Protect vulnerable areas
Outstretched elements, such as wires or appendages on figurines, could snap off during or after printing if the joint is not strong enough. See an example of what we mean. - Ensure clearance for moving parts
Moving parts need clearance between one another to function properly. This is especially important when designing for Strong & Flexible Plastic—without enough clearance, the parts will fuse together during 3D printing. Learn more about designing for mechanical parts. - Make sure details are large enough
Embossed and engraved details have minimum requirements to ensure they come out clearly. Check the Design Guidelines for your chosen material. - Compensate for smoothing modifiers (if used)
3D printers do not read smoothing modifiers, so instead, sub-divide your mesh to replicate the effect of smoothing. - Optimize your colors
If designing for Full Color Sandstone, check that your Shapeways render matches your expectations. CMYK is best at producing bright, well defined colors. Skin tones are particularly difficult to print. Check out our tips on optimizing color. - Don’t forget to read our content policy
We encourage the endless possibilities of your creativity but ask that your designs respect our content policy. - Check your models for free
Shapeways 3D tools provides designers with more transparency and functionality as you prepare designs for 3D printing. There are automatic checks, visualizations, and automatic fixes you can apply before you order, accessible directly from your model on Shapeways. - Remember real-world physics
You may have complete freedom in 3D modeling software, but gravity still exists. Think about how your product will balance, and pay special attention to any vulnerable areaswhere different elements connect. - Double-check your scale
You likely specified the units of your model before uploading, but it can’t hurt to check the dimensions of your uploaded design on Shapeways before printing.
3D Printing with SketchUp: 10 Tips and Tricks
SketchUp is one of the most popular 3D modeling & design programs for 3D printing, as we found out from our analysis in August. However, preparing a SketchUp model for 3D printing can be a little tricky. That’s why we put together a list of 10 simple yet effective tips and tricks to make your SketchUp design 3D printable.
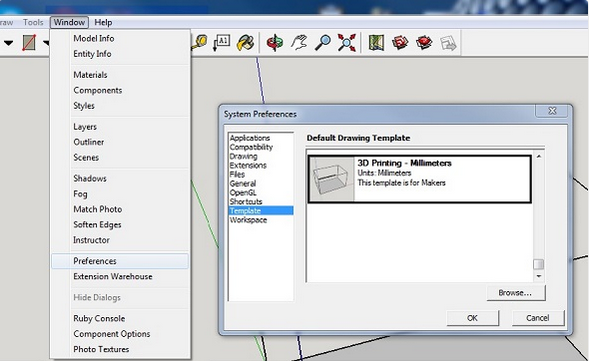
1: Set your Template to Millimeters or Inches
Some simple clicks before getting started will make your life easier: you may want to set your SketchUp template to metric or imperial units. This way, you won’t need to re-scale the printing size of your model later.
You can change the template by clicking on Window > Preferences > Template and selecting ‘3D Printing – Millimeters’ or ‘3D Printing – Inches’.
2: Install the SketchUp STL Extension
Typically you can save your 3D model as a SketchUp file (SKP). Even though our online 3D printing service accepts these files, you might want to get SketchUp’s free STL Extension. The STL file format is the most commonly used in the 3D printing community and will make it easier to share, print, and edit your design in other software.
With the SketchUp STL extension installed you can export your model as a STL file. Make sure to select the same unit type that you chose in your template (millimeters or inches) when exporting, and choose the binary file format to reduce the size of your file.

3: Avoid Paper-Thin Surfaces & Set Wall Thicknesses
In order to make your SketchUp model printable, you need to ensure that each and every surface has a wall thickness. Without setting a wall thickness, a 3D printer has no information about how thick or how thin it is supposed to print your part.
The picture below shows a model with paper-thin surfaces (not printable, left) and a solid object with thick walls (printable, right). If you want to learn more about how thick your walls need to be exactly, make sure to read this blog post.

4: Make Your Model Watertight (Manifold)
A printable model must not feature any holes in its surface. Ask yourself the question: if I were to put water inside my model, would it flow out? If that’s the case you need to find these holes and close them. This is one of the trickiest parts of creating 3D printable models in SketchUp.
The design below is an example of a model that is not watertight. You can clearly see that there is one big hole on its surface.
Once this hole is closed (for example by drawing new lines), SketchUp recognizes that the object is solid on the inside and ready for the printer! You can see such a watertight (also referred to as manifold) object below.
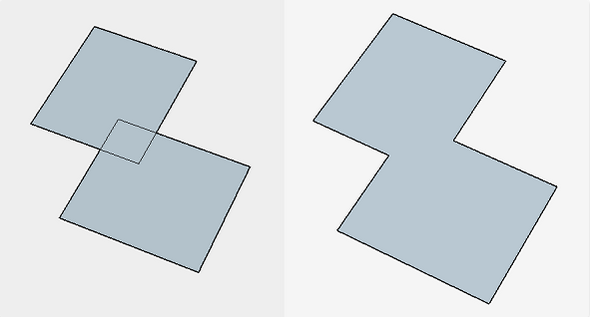
5: Avoid Internal Overlapping
Intersections and walls within your design can make your life difficult since your model needs to have one continuous ‘outer shell’. That’s why it makes sense to think about your model in a 2-dimensional space first.
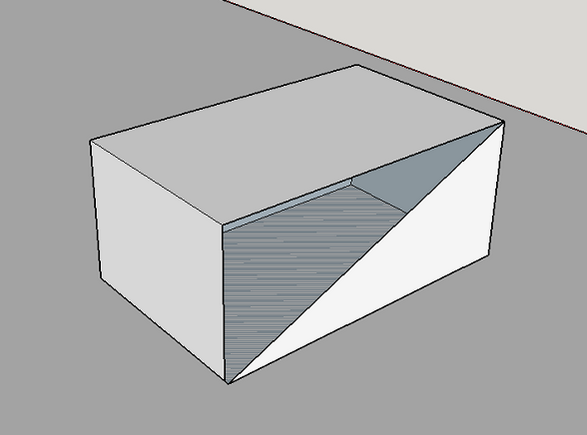
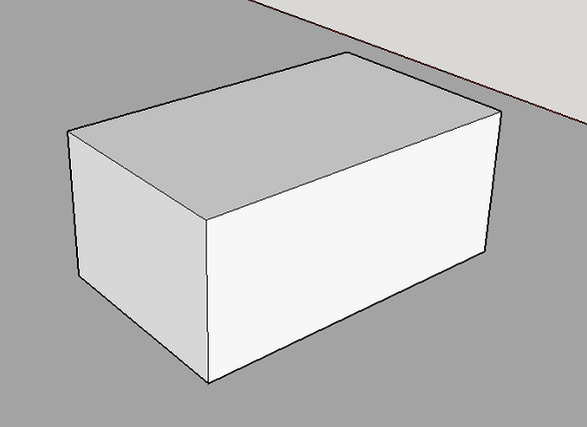
In the case below, the left shape will not be printable once it is pulled into a 3-dimensional object since it will feature paper-thin walls within the object. The shape on the right, however, won’t be a problem to print once it is pulled into a 3D object because it will only have one ‘shell’. It doesn’t feature paper-thin walls on the inside. We’ll look at an automatic way to create one outer shell later.
6: Check if Your Model Is Solid
Creating watertight models with one continuous outside can be tough sometimes. Luckily SketchUp lets you check if you made any mistakes.
Here’s how it works:
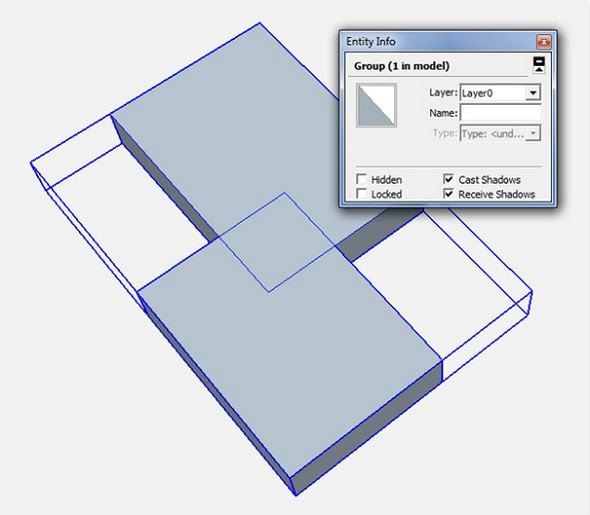
- Triple-click on your model with the select tool (this will select everything).
- Right-click on your object and select ‘Make Group’.
- Right-click on your object again and select ‘Entity Info’.
If you designed an object with holes (not watertight) and internal intersection (not in one shell) the Entity Info window will say ‘Group’. This means that your model is not printable and you’ll have to check it again. Right-click on it and select ‘Explode’ to re-edit the components.
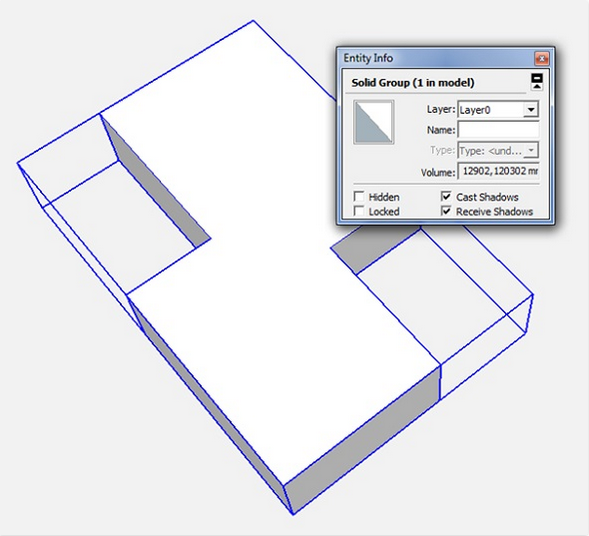
If you designed a watertight model in one shell, the Entity Info window will say ‘Solid Group’ and then you know that your model is ready to be 3D printed (in the next steps we’ll tell you how to fix this).
7: Look inside Your Model with the ‘Hide Tool’ and ‘X-Ray-Mode’
Looking at your model from the outside means that the inside is a ‘black box’ for you. However, even the inside of your model could feature many modeling mistakes that would make your object unprintable. In the example below, the ‘Entity Info’ window indicates that the object is not solid.
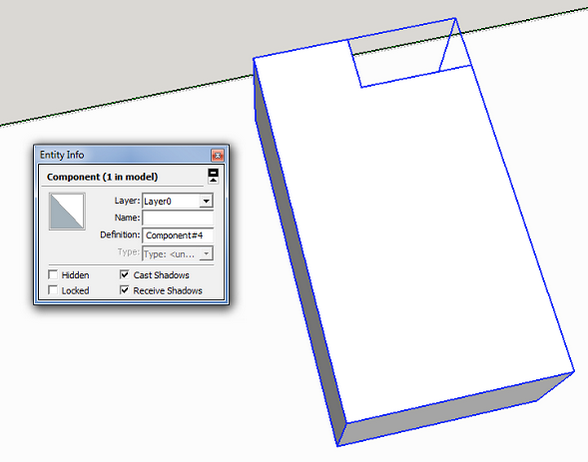
Since it looks solid from the outside, it makes sense to take a look at what’s going on inside. Select a surface (face) you want to hide and select ‘Edit’ > ‘Hide’. And voila: you can find the trouble-making mistake. Alternatively you can switch into x-ray-mode by clicking on ‘View’ > ‘Face Style’ > ‘X-ray’.

8: Create an ‘Outer Shell’
We already pointed out that designs with overlapping objects create problems for 3D printers. The good news: there’s an automated solution for creating one ‘outer shell’ around the overlapping objects, deleting all internal overlapping parts.
To start with, we have these two solid blocks. Each of these blocks was ‘grouped’ separately (Select > Right click > Make Group). We also selected the x-ray view to make things easier.

We then move one block into the other. We now have overlapping areas in the interior of this object.
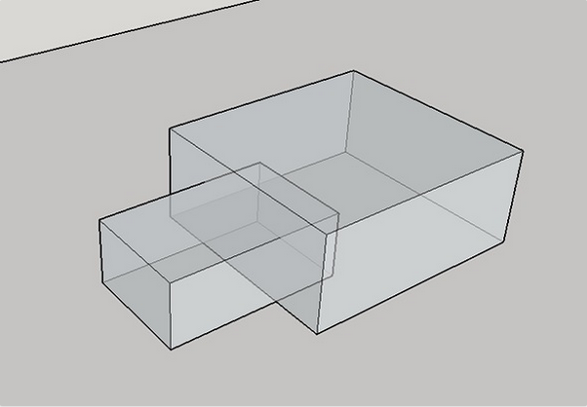
To get rid of these, we select one block, click on ‘Tools’ and choose ‘Outer Shell’.
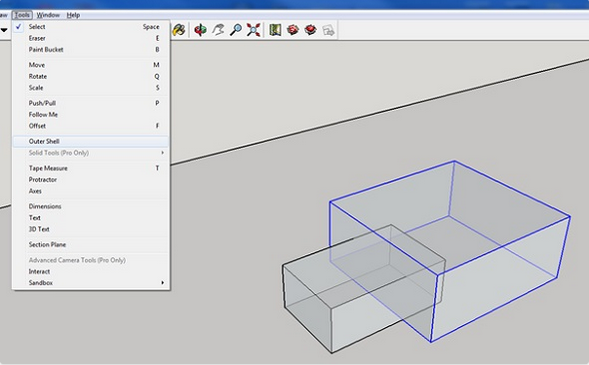
The last thing to do is to click on the second block. SketchUp automatically created one solid group out of these blocks. As you can see, the internal overlapping parts are gone. The result is a new solid object that is ready to be 3D printed!

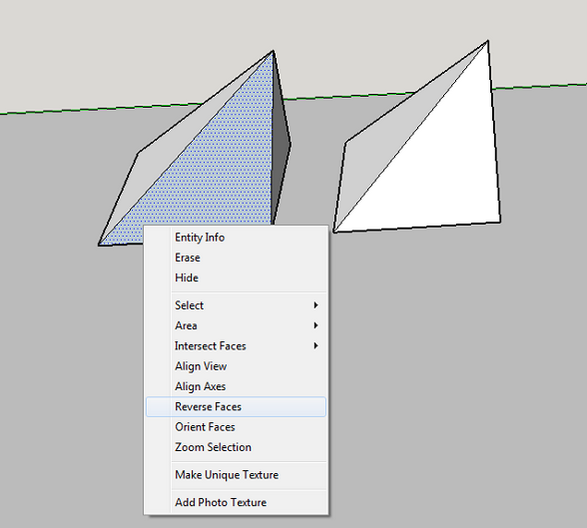
9: Fix Reversed Faces (Inverted Normals)
Another problem that can occur are so-called inward-facing or reversed faces. This means that a surface of your model is facing in the wrong direction (typically this means that it is facing the inside of the object instead of the outside). These surfaces are automatically colored in light blue.
To fix this, right-click on the inward-facing surface (face) and select ‘Reverse Faces’. You can see an example of this in the image below (left). On the right you can see the object how it is supposed to be: all faces point to the outside again.
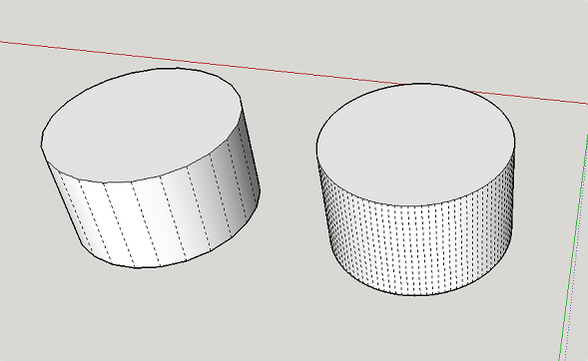
10: Increase Circle/Arc Segments to Get Smooth Curves
SketchUp ‘smoothens’ arcs and circles in its visual presentation. Even though circles might look perfectly spherical in SketchUp, they are actually only made of 24 sides. Click on ‘View’ > ‘Hidden Geometry’ to see theses sides. When being printed, this circle might come out quite edged.
When you select the arc or curve tool, SketchUp will show you their default sides in the bottom right corner. You can then enter a higher number to increase the number of sides. Validate your entry by hitting the ‘Enter’ key and then draw your arc or circle.
The image below shows a comparison between the default 24 sides (left) and 150 sides (right).
Extra: Automatic File Fixing and Preparation
Sometimes problems are tiny and hard to see with the naked eye. There are SketchUp extensions like the Solid Inspector that find problems automatically and point them out to you. However, they do not fix them automatically.
But there’s help: SketchUp added a cool feature to their 3D Warehouse that was developed byMaterialise. When uploading a model to the 3D Warehouse, you can check the “I want this to be 3D printable” button (see video below) to get modeling errors fixed instantly.
This tool will make your 3D model watertight and allow you to download it as an STL file. While it might lead to somewhat less accurate results, it’s the fastest way to get a printable file. So if you’re searching for an easy-to-use tool that will save you a lot of time and effort (no more searching for file issues, no more exhausting fixing sessions), this is the tool for you.
8 Tips for 3D Printing with Sketchup
3D Printing
3D printing is awesome – we can all agree on that. You send a 3D computer model to a machine and out comes a finished part, ready to use as an end product or as a prototype before mass manufacturing. With the rise of personal 3D printers like the Makerbot Replicator 2, and 3D print services like Shapeways andPonoko, nearly everyone has access to this technology.
But how does one get started making awesome models for 3D printing? Its one thing to make a model look good on the screen, but quite another to make a model that looks good and actually works in real life. The process of modeling for 3D printing is much the same as 3D modeling anything else, but with a few specific requirements. Here are some common problems that I see beginners struggling with and how to address them.

1. Make your model “Solid” in Sketchup to be 3D Printable
Models must be “Solid” to be 3D printable. This is by far the most common problem beginners have when modeling for 3D printing. Here are some examples of Solid Sketchup models.
Solid, sometimes called “watertight” or “manifold” simply means the model is a complete enclosure. If you were to fill it with water, none would drain out, and the model must not have any extra lines or faces. If you make your object into a group or component, Sketchup will indicate when its solid in the Entity Info dialog box (Window > Entity Info).
Another way to define solid: Every edge in your model must be bordered by exactly two faces.If an edge has less than two faces bordering it, there is an adjacent hole, and if there are more than two faces touching an edge, there is an extra face that needs to be deleted.
The most common errors (and the corresponding solutions) are:
- Stray edges (just delete them)
- Holes (trace an edge to fill them)
- Internal faces (delete them)
Use the Solid Inspector extension to help highlight problems.
2. Give your walls thickness
 Wall thickness is a key element in 3D printing – walls need to be thick so they’re strong enough to work in real life, but also need to be minimized to reduce material costs. I’ll discuss how to determine what wall thickness to design at in just a bit.
Single faces in Sketchup have no thickness, so we need to simulate wall thickness by simply placing two faces a short distance apart.
Here’s an example where Matt demonstrates modeling a vase with a 1/4” wall thickness using the offset tool. The amount of the offset determines the wall thickness, and the thickness you need will vary depending on the material you are printing in. For example, some plastics may require a wall thickness of less than 1 mm, while 3D printed ceramics require a minimum of 3 mm.
3. Scale up by 100 (or 1000) to make small parts
If you design things with features smaller than 1/16”, you may run into trouble where Sketchup doesn’t create faces. You often won’t get an error message or any indication there’s a problem, but Sketchup simply doesn’t generate the geometry.
There’s some interesting history behind this problem. Sketchup was originally developed for architects. Since architects don’t typically need precision greater than 1/16”, the developers designed Sketchup to work best with geometry of about 1/16” and larger. Apparently now it’s nearly impossible to fix the problem without redesigning Sketchup from the ground up.
The workaround for this problem is to scale up your model to perform the work, then scale back down for printing. I typically use a scale factor of 1000 to keep the math simple.
4. Increase circle/arc segments to get smooth curves
Sketchup is a “polygonal surface modeling” program, which means that models are made from flat polygon faces – flat surfaces and curves alike. Curves are approximated using many flat faces – for example the default circle in Sketchup has 24 sides. You can see this clearly by turning on Hidden Geometry (View > Hidden Geometry) while looking at a curved surface.  Sketchup uses a visual smoothing technique to make the flat segments look like a smooth curve on the computer screen, but when you 3D print a curved surface, the individual faces (or facets) may be visible.
The good news is that the more faces a curve is made of, the smoother it becomes. When using the arc or circle tools, you can set the number of segments to whatever you need. You should increase the number of segments so each individual segment is about 1/32” (1mm) long. Depending on your printer and the material you’re using, the number of segments needed will vary, but for smooth parts this is a good rule of thumb.
5. Model parts as separate components; use Outer Shell to combine
This is one of those tips that can save you literally hours of work. Often you’ll be modeling away on your project, perhaps nearly complete, when you realize a feature you modeled earlier needs to be changed.
For example, you’re working on a scale house model, and the client decides to change the roof style. If you’ve separated the walls and roof into components, its easier to update the roof if its not attached to the walls than if they’re one connected mass. Using components also lets you hide(or turn off via Layers) different parts of the model to make modeling complex models easier.
Another advantage of separating the model is that errors are easier to find and fix. Make sure each component is solid as you go along, and you’ll have less headaches at the end.
When you’re happy with the model, save a copy so you can still make changes later, then use the Outer Shell (Tools > Outer Shell) command to combine all Solid components of the model into one solid ready for export to a 3D printer.
——
A shortcut when drawing a model is to draw 1 half and then copy and flip the model to create the second half. To do so, you copy the model, scale the copy with a -1 factor using the Green Scale about Opposite Point grip. Another option is to right-click on the model, and navigate to the Flip Along / Group’s Green, where Green refers to the green axis. Once you have the 2 halves, use the Outer Shell tool to combine everything into one solid model.
For the Intersect with Model command to work, the 2 intersecting parts need to be in the same context, which means the parts to be intersected must not be in separate groups. Select the entire box and go to Edit > Cut to remove the box and copy it tot he clipboard. Open the cradle group and go to Edit > Paste in Place to put all geometry in the same context, keeping the placement of the box intact. Then select everything, then right-click on it and go to Intersect Faces > With Model. The Cleanup extension can delete any stray edges. Some faces are reversed but are easily corrected by right-clicking on a white face and then on Orient Faces. (if the Orient Faces command isn’t working as you expect it to, the model likely isn’t a solid. Check the model for interior faces and delete them.)
6. Use plugins to work faster
Plugins can help you work faster or do things that Sketchup simply can’t do. Use Solid Inspector (you’ll need to sign up for a free account at Sketchucation to download the plugin) to help you find errors that prevent your geometry from forming solids. Once you have made a group (or component) that’s not “Solid”, select the problem group and run Solid Inspector from the Tools menu. All the errors in the group are circled in red or yellow. You can use the Tab and arrow keys to cycle through the errors, and Enter to zoom in to them. The tool will not fix the error, but you can sort them out quickly on your own. One thing to look out for – Solid Inspector will not return an error when you have nested groups or components.
(Hey, Matt here… Check out my article Best 3D printing Plugins for SketchUp, where I go over my favorite plugins!)
3D printers don’t take Sketchup files directly, so you’ll have to export to another format – usually STL. To export to STL, use this new plugin from Sketchup: (Direct download Link) Sketchup STL Exporter. When exporting, choose the units of measurement, then choose STL and add the .STL file extension to your export filename in the save dialog box.
7. Know the print material specifications and limitations
As amazing as 3D printers are, they still follow the laws of physics. You’ll get the best experience by understanding how the printers work, and ensuring your part meets the specifications. If you’re an artist designing around the print material, you’ll want to understand the process deeply, while if you’re an inventor using the technology to make prototypes, you just need to determine what material best suits the needs of your particular model.
Design information is often available online for the system you are using. For example, Makerbot has detailed design guidelines available here. Shapeways makes design guidelines available on each materials’ page – here’s what the guidelines for the most popular material looks like: Strong and Flexible Plastic Guidelines.
These guidelines are where you’ll look to find minimum wall thickness, minimum detail, maximum build size, and many more technical details. Print services and 3D printer manufacturers often have a forum for users to ask questions. These forums can be a gold mine of information and a go-to resource to ask specific questions that aren’t answered anywhere else on-site.
8. The more material in your model, the more it costs
The concept of 3D printing – or additive manufacturing – is fundamentally different from subtractive manufacturing, where you start with a block of material and cut away what you don’t need. Using this method if you paid $20 for a sheet of plywood and only use half of it, your material still costs $20. In 3D printing, you pay for only the material you use, so it is best minimize the volume of your model.
Minimizing your wall thickness is the easiest way to reduce volume, but there are other things you can do. Creating a pattern of holes in the part is another way to reduce material significantly, and allows you to add artistic flair. Depending on the part, you may even be able to design a mere skeleton of the part you need, much like Jeff Bare’s iPad wraps.

In fact, some of the best examples of 3D printed art are skeletons of an object. These 3D printed dicedesigned in Sketchup by Chuck Stover gained a firestorm of attention when they were introduced. What Chuck did, besides designing a beautiful set of dice, was to minimize the amount of material needed to make each part by leaving the centers hollow. While these dice would have been impossible to create in with any other manufacturing method, they are easy to 3D print and indeed helped decrease the costs of manufacturing!
9. For 3D printing, non-Serif fonts such as Arial work best, and bold versions print even better. This is because with small sizes, the thinnest parts of Serif fonts (the serifs) are too thin to be shown in the final print.
10. If a printer needs you to convert your files to a format SketchUp does not support, check out the free program, Meshlab (http://meshleab.sourceforge.net). With its many import and export options, you will find that it can likely provide a solution for you.