OBJECTIVE:
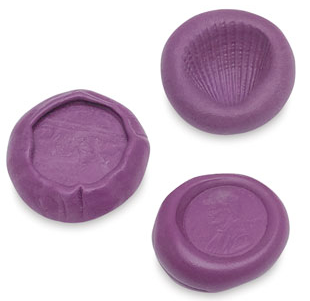
Create a silicone push-mold of a part of your body [see above], and a multi-part mold of another object (this could be a plaster mold or a 3D printed mold if you like – see below). Create a sculpture by casting multiples from both of your molds and assembling them using any connection/adhesion process you like.

You can cast any material you like: plaster, polymer clay, chocolate, melted sugar, cheese, butter, resin, wax (Paraffin Wax is sometimes available at the grocery store in the canned goods), paper mache, cement, soap, low-melt metal, baked goods, ice cubes, air-dry clay etc. You should only cast the edible materials into the silicone molds (the silicone is food safe). If you cast non-food into the silicone, it is no longer food safe.
You must be able to conceptually justify your choices. Think carefully about multiples, the material you are casting, and the message you want to communicate. Think about the meanings that can be associated with the body part you choose to mold/cast. How will your two types of objects interact and why?
STEPS:
- Research/Brainstorm: Find at least 5 artists working in molding/casting/multiples that intrigue you. Print off photos of their work in color and put them in your sketchbook. Also in your sketchbook, create at least 10 thumbnail sketches for 10 different ideas for your project. We’ll share the research/thumbnails in class. For your multi-part mold, choose an object that is fairly symmetrical & with a smooth texture for your first cast. Fruits and some vegetables are ideal for casting, as well as industrial everyday objects. Check your object with me before you begin. It is also advised that you come to class with 3 to 5 objects so you have alternatives.
- Sketches/Narrowing Ideas: Having heard everyone else’s ideas and research, sketch out 3 ideas in greater detail (devote at least 1 whole sketchbook page to each of these ideas). You will make rough 3D mock-ups of each of these 3 ideas out of paper. We will share these refined ideas in class.
- Select idea and begin working: Once you select your idea, you will need to make your molds. It may be useful to make another more refined mock-up out of paper to determine a clear plan for your castings. We will have in-process critiques – see schedule for dates.
- Final Critique: We will hold a final critique of the sculptures
- Document your work.
- Self-reflection: After the project is over, you will answer the following questions on Canvas to revisit your project and review how you performed. [1.] Discuss your work in terms of the components of an artwork. (subject/form/content/context) [2.] How does the work engage with elements and principles of 3D design? Make sure to mention specific elements and specific principles. [3.] How was your project successful? [4.] How could your project be improved?
GRADING:
Research/Brainstorming – 5pts
3 Sketches/Mock-ups – 5pts
Craft of finished sculpture (how well did you mold/cast your materials) – 5pts
Originality/Inventiveness of finished sculpture; quality of your material choices – 5pts
Quality of your compositional choices – 5pts
Self-Reflection – 8pts
SILICONE PUTTY CASTING PROCESS – STEP BY STEP INSTRUCTIONS
NOTE:
- In the video they use a different brand of silicone putty, so you will not have quite as much time to create the mold (closer to 3-5 minutes of working time). It takes 25 minutes for our silicone to completely cure.
- Be very careful of your orifices (openings to the the inside of your body). You don’t want silicone to get stuck inside your ear, nose, eyes, etc.
- Be very careful of your hair. It can be helpful to use petroleum jelly to prevent your hair from getting stuck in the silicone.
Also available: Step-by-Step instructions for making Lego Candles
THE MULTI-PART CASTING PROCESS – STEP BY STEP INSTRUCTIONS
Credit: Thomas Sakoulas @ State University of New York at Oneonta
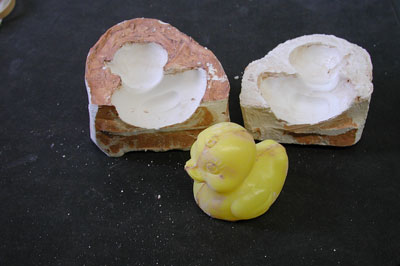
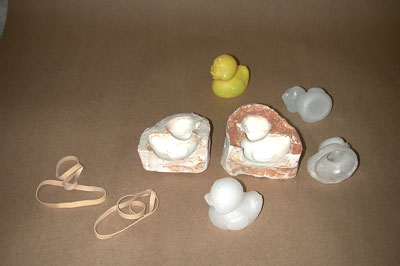
In order to cast an object (let’s say, a rubber duck) in a different material, first you must make a MOLD. Once the mold is prepared, you can cast the original object in a variety of material.
In order to make a mold you can use plaster, although silicone is a better (albeit more expensive) material because it is flexible and less likely to get stuck to your original object. A mold made of plaster is a rigid mold and therefore great care must be taken to account for all the undercuts in the piece, otherwise you won’t be able to remove your original object from the mold. Making rigid molds of pieces that contain a great number of undercuts requires you segment the mold to multiple parts.
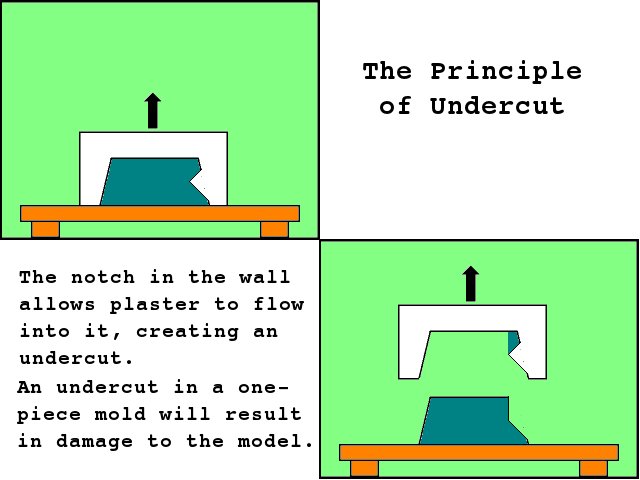
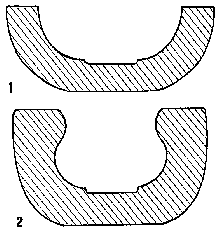 <– UNDERCUT REQUIRES MULTI-PART MOLD
Here are the basic steps to make a mold and a cast of a simple object:
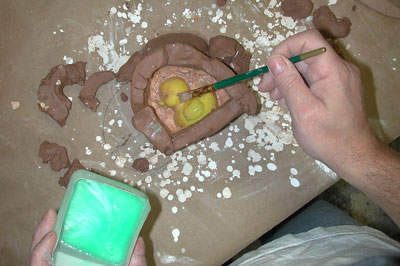
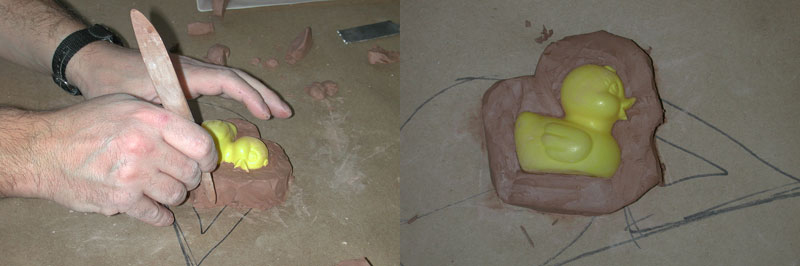 Create a clay wall around half of the object – it should look something like this. Make sure to coat the object and the clay with mold release (petroleum jelly works fine, or you can by a commercial spray release) to prevent the object from sticking to the plaster.

Option 1: Create a retaining wall so the plaster does not spill all over the table. NOTICE the “plug” in the bottom of the object designed to create an opening at the bottom of the object (this will create a hole through which you can pour your casting material)
Option 2: Since the duck’s entire bottom does not need to be cast, it does not need a “plug”. The entire bottom will be open so the mold can receive the casting material.
DON’T forget to create Registration Marks at this point.

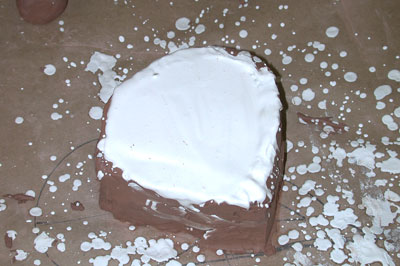
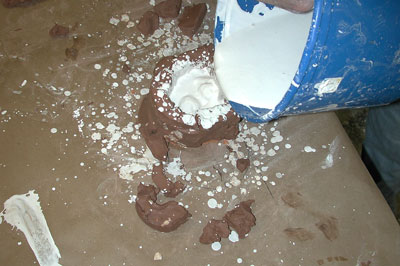
Mix plaster. The “Splash” coat is a thin coat of plaster that is splashed on the object. This way the plaster is forced onto every detail of the object. It is applied with a finger flicking technique.

Once the splash coat is completed, I pour more plaster until the whole object is covered.
Wait for the plaster to set. Once the plaster gets hot and begins to cool, you can remove the clay (but NOT the object)
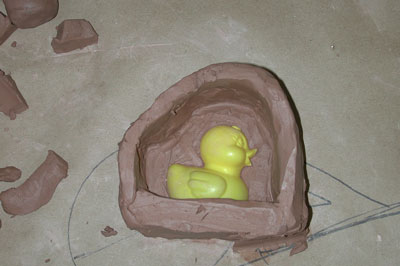
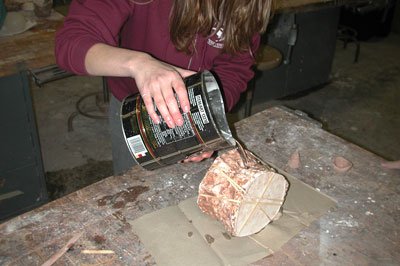
Remove the clay and turn the object over. The plaster now is now visible around the Duck. Construct a retaining wall again.
Plaster sticks to plaster! So before you pour plaster, make sure to apply a liberal amount of a separating agent to the entire surface (for plaster common liquid soap will do).
Do the “Splash Coat” routine and pour the plaster again. Wait until it sets.
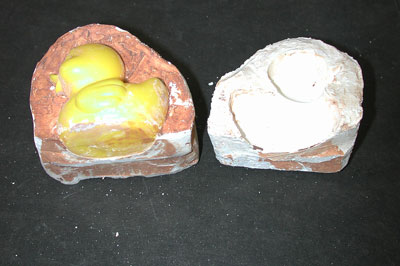
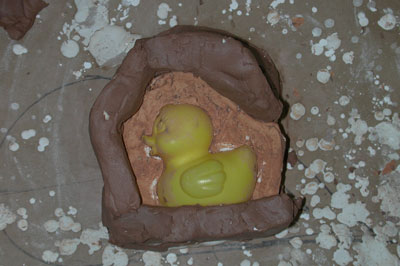
Open the mold carefully. If it does not open, try to pry it gently at the seam. Using compressed air at the seam often works to brake the surface tension. Remove your original object, and put the 2 sides of the mold back together and bind with rubber bands.
IF CASTING WAX: Soak the plaster mold in Water
This step applies only if you are casting in Wax:
Remove the object and soak the mold in water for about 15-20 minutes (more time for larger molds). If you do not soak the mold the wax will get stuck in the mold.
Melt the Wax in a double boiler, and pour it into the mold.
Let the wax cool and open the mold. Repeat as many times as you like.
Notice that you can cast hollow objects by swirling the mold around after you pour wax in it. This way you build a wax wall on the surface of the mold as it cools. Pour excess wax out of the mold once sufficient wax wall has been built.