It is important to be able take good photos of your work. It is also important to know how to maintain a blog/website/photo sharing site (as professionals in your field, networking is integral to your success). When you are documenting your homework, please follow these important guidelines:
- Rotate your images so they are correctly oriented (no images on their side or upside down).
- Crop the image so there is not any unnecessary negative space surrounding the piece in the image.
- Finish images/video by color-correcting. If you don’t know how to color correct in photoshop, here is a link to a few approaches (feel free to do Google searches to find more tutorials for any editing software you might be using).
- Make sure that all of your images have a consistent feel and look.
- Re-size files after all necessary changes have been made.
- Finally, save/export the file (you may think you know how to save, but you should watch the video to make sure you’re doing it well).
GUIDELINES FOR QUALITY PHOTOS/VIDEO
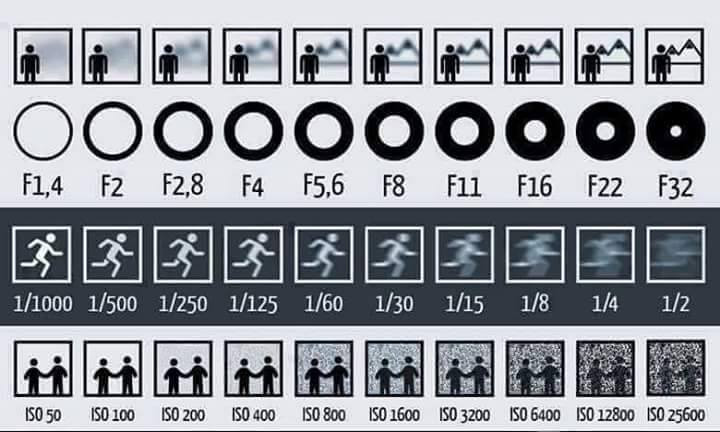
1. On your DSLR, make sure you are shooting in Manual Mode (this will allow for more control).
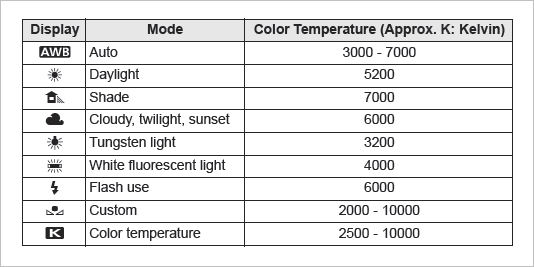
2. Check the white balance to make sure it is correct for the type of lighting you are shooting under.
3. Indirect lighting is good and natural indirect lighting is even better. A room with windows can offer indirect sunlight, even on an overcast day. You do, however, want to avoid sunlight striking your object directly, as this will cause glare.
Artificial lighting can work if natural light is unavailable. In this scenario, two or more light sources — preferably of similar wattage strengths — should be set at about 45º angles to the piece, off to either side. “Off” as in: out of the peripheral vision of both you and the camera lens. Your goal here is to light semi-naturally but not, I repeat not to cast shadows. Manipulate wisely with an eye toward even lighting. Lighting is extremely important in producing correct color. If you find you need lights, hardware stores often sell clip lights or construction site work-lights for less than those at a photography store.
4. For still images, set your artwork up to take the picture from its centermost point. You don’t want to be at an angle where you are higher or lower than the center of the artwork, as this will cause your photograph to be distorted. If it is hanging on the wall, center *yourself* in order to point the lens squarely — the lens and the work of art are on parallel planes (“plumb”) when you shoot. Tilting your viewfinder up, down or sideways is not going to achieve the best result.
6. Make sure to use a tripod, because still photography is best done with a tripod. Lacking this piece of equipment, however, you can do the following to minimize any motion:
- Use both hands to hold the camera.
- Draw both elbows in to your midpoint until they’re close to touching one another, then firmly hold elbows and as much of your forearms as possible to your torso/chest. Your hands will be free to aim and shoot, but your arms won’t be moving. Much.
- Hold your breath just before and while hitting the shutter.
7. Your images should be clear and in focus. This is especially critical with artwork that has fine detail.
8. For 2D/3D works, make sure you have a solid background. If your art work is in a frame, remove it from the frame to photograph it. Make sure nothing is in the background of your images – do not take photos of your work against the garage, or sitting atop your couch.
9. Take many photos/videos of your work using different lighting and settings to get the best possible results. You can pick the best image of the bunch.
10. Turn OFF the Flash! Please, unless you know how to “bounce” flash from the camera to a middle surface and then to your object, turn this function off. The flash function also has an amazing talent for leveling tones, evening out contrasts and wiping away shadows.
Info credit: http://arthistory.about.com/od/collecting_and_appraising/l/bl_photoartqt.htm
——————————————————————-