As artists, unless we live in a city with ‘unlimited’ exhibition opportunities, we will likely need to prep our work for shipping via mail, UPS, FedEx, etc. Designers will sometimes need to mail applications or other materials to possible clients / jobs.
Rarely, though, will standard packaging work for our needs; often our pieces are non-standard sizes (artists) or we want to make custom materials for helping our applications stand out in a crowd (freelancers).
Step 1: Choose a Piece
ARTISTS: Start this assignment by choosing one of your pieces from your senior exhibition that could be shipped to a buyer / exhibition. Think about which piece(s) you WANT to continue showing or that you WANT to sell.
FREELANCERS: Since you do not have ‘art’ to ship, you will be producing materials that would be sent as an application to a job. This will include an envelope for mailing résumés, cover letters, business cards and a disk/jump-drive with samples of your work.
Step 2 (ARTISTS): Make a Plan
Once you have selected the piece you are going to ship, then you will need to make a plan for HOW you will package and ship your work.
Packaging and shipping work can take many forms: wooden crates; custom cardboard boxes; modified, standard shipping boxes; etc. Here are some pros and cons of each:
Wooden crate — this adds a lot of stability to the piece, and wood tends to be more resilient and protective than cardboard. Wooden crates can be custom-built to suit your needs and you can add different braces depending on your needs. Wood also comes in a variety of types — such as plywood, masonite, MDF / HDF — and sizes. Crates made of wood can also be reused.
Some disadvantages to building a wood crate are that you need power tools to make the process efficient. Wood crates also tend to weigh more, which means that shipping costs can go up very quickly depending on the size of the crate. Building a wooden crate also requires a lot of advanced planning, since pieces will need to be measured and cut, and the various supplies — screws, nails, wood glue, latches, etc. — need to be planned for and purchased in advance.
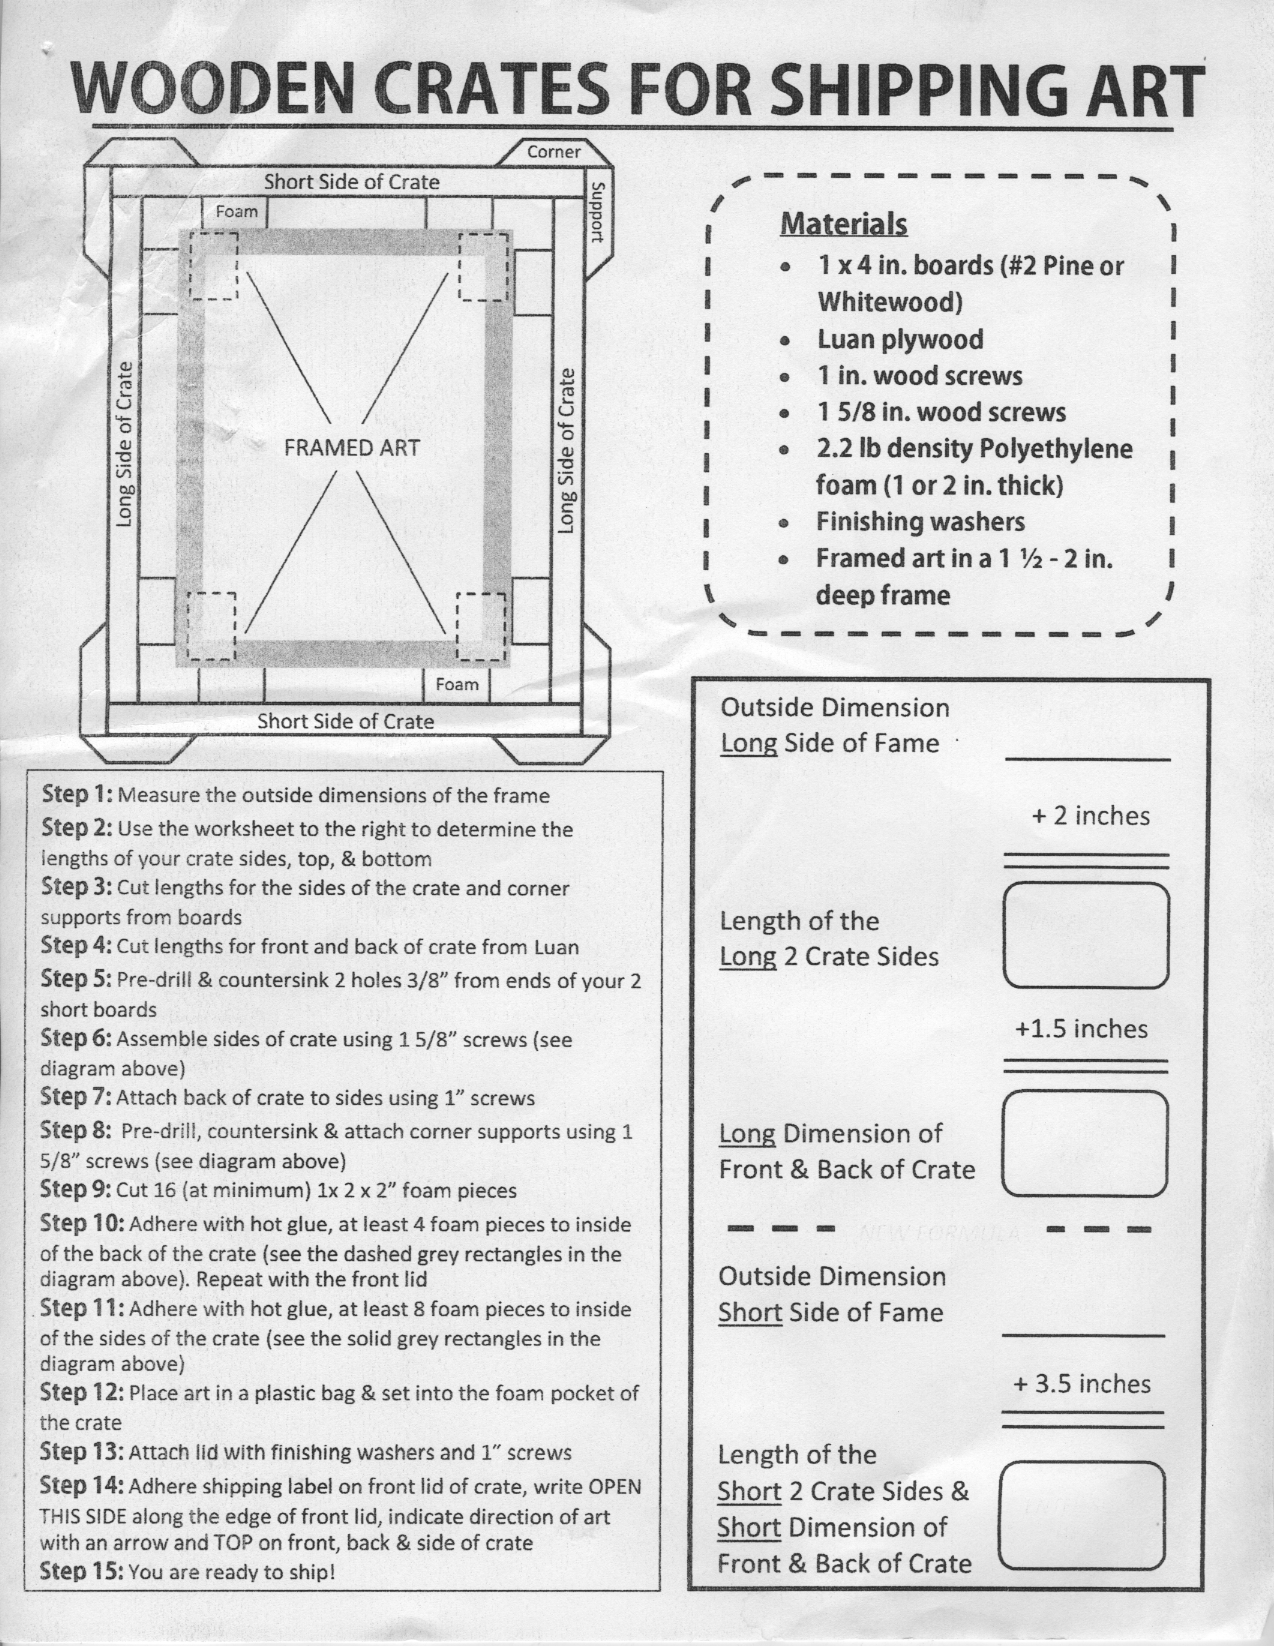
click to enlarge
Custom cardboard box — a custom cardboard box can be built quickly and is typically cheaper than building a wooden crate. The materials list is also much smaller than wooden crates — cardboard can be cut effectively by using a box cutter, and hot glue makes an excellent adhesive (use high-temperature hot glue). Cardboard can also be laminated, which can make your boxes sturdy and very protective.
Disadvantages to cardboard boxes include needing large sheets / pieces of cardboard, depending on the size of your work. Cardboard is also more flexible than wood (in general — it can be braced) and so precautions need to be taken in order to make sure that your piece is safe during travel. Cardboard can also be easily pierced or torn in transit, requiring repair or replacement.
Modified cardboard box — another option for cardboard is to purchase / find a pre-built cardboard box that can be modified using pieces of cardboard, foam, bubble-wrap, etc. Using pre-built boxes saves a lot of hassle of trying to plan and engineer a box from scratch, but since the box is not custom-built for your piece, you (and your shipping options) will be limited by the box’s construction. Although this might be the cheapest option, you may not be able to get a ‘perfect fit’ and will need to plan packing materials to make up for limitations of the box itself.
Packing materials — all boxes / crates, regardless of what they are built from, will need some sort of packing materials to help keep the work safe inside. Materials can be simple like a sheet of paper to protect the surfaces (if your box / crate is built strong enough to offer enough protection on its own), or materials can be more advanced / supportive (fabric bags, foam bumpers, plastic sheeting, bubble wrap, packing peanuts, foam wrap, etc.). Packing materials should work in tandem with your crate to ensure that the piece is sufficiently protected.
Your crate / packing materials must be able to withstand the following:
Drop from a height of 3 feet — When shipping our work — unless it’s through a certified art handler — we can never be sure how our work will be handled by shippers:
Partially submerged in and sprayed with water — Unless you can control the weather, your work may be subjected to all manner of storms, flooding, rain, snow, etc. Everything from blizzards to ice storms to hurricanes could affect your work.
GRADING:
10 points – Submit a DETAILED schematic drawing of how you will construct your shipping box / crate, including ALL materials that will be used. Your schematic MUST include detailed measurements and explain how the work will be protected in the shipping container. You will submit this PDF on Blackboard, and it will be presented to the class.
Step 2 (FREELANCERS): Design A Packet
Freelancers will be developing a packet of materials that must include the following:
- Résumé
- Cover letter
- CD / DVD / jump-drive with portfolio samples
- Image list
- Business cards
These materials must be packaged in a cohesive packet, which includes an envelope and CD case/jump-drive.
GRADING:
10 points – Submit 5 sketches of possible concepts for how you will construct your packet. You will submit a PDF on Blackboard, and it will be presented to the class along with 5 mock-ups that are executed to-scale (or 1/2 scale if elaborate folding is needed). The mock-ups can have placeholders in place of the cd/jump-drive/documents. Things to think about include (but are not limited to):
- What kind of envelope will I use?
- Will I fold my materials?
- Does the color of the envelope matter?
- Should it be a bubble mailer or a regular envelope?
- How will it be mailed?
- Will I leave all of my materials loose in the envelope, or will I include a folder?
- How will I integrate my personal brand across these elements?
STEP 3: Testing/Final Crit
ARTISTS: Your finished shipping solution must be ready to be dropped from a height of 3 feet and Partially submerged in & sprayed with water.
DESIGNERS: Your finished packet should be ready for critique.
This is a Pass/Fail assignment. (Artist boxes must pass both tests, while designer packets must include all the required elements and be visually intriguing/effective)