IMAGE APPROPRIATION, LAYERING, MASKING AND MONTAGE
We will Read/Watch:
“We’re in the Age of Fake Photos and Videos—Here’s How to Spot Them”
(stored in the ‘Files’ section of our Canvas course)
Remixing & appropriation timeline presentation & overview presentation
Project Goals/Objectives
- Acquire working skills initiating, editing, and developing a meaningful image that incorporates multiple images appropriated from the Internet or other pre-produced sources through experimentation, trial and error
- Discuss Appropriation and issues tied to appropriation; legality and copyright, commercial use vs. educational setting; Artists who have used appropriation; public domain
- Examine ideas of Utopias/Distopias
- Understanding and employing non-destructive image editing methods (Layer Blending Modes, Opacity, and so on)
- Finding and evaluating an image for use: dimensions – inappropriate resolution (too low or high), compression artifacts
- Creating new workspace, opening content and gathering and transforming/scaling it to get started.
- Layer stack order, layer duplication, juxtaposition, perspective/point of view, focal point
- Layer Masks – starting and editing with brushes, editing with selections, mask editing, viewing masks, linking masks
- Selections – combining, subtracting, feathering, modifying and juxtaposing – using blending modes, masks, opacity, stacking order, sharpen and blur to create a focal point.
- Adjustment Layers – the various Properties, how they affect layers below, using the associated mask
- Smart filters
For this assignment, explore the notion of Utopia and Dystopia by combining images. This project is an opportunity to create rich, meaningful images using layers, layer masks, blending modes and opacity (non-destructive editing methods).
Experiment with editing out visual information that is not needed or detracts from the potential future meaning. This assignment requires careful observation, formulation and a willingness to experiment. An idea can be roughed out somewhat quickly, and then, taking time to refine the mask and make adjustments, can be worked on in both additive and subtractive ways.
- Work with Layers, Transformation, Layer Masks, blend modes, opacity, Drawing Tools, and Selections to create no less than 2 different compositions.
- Use your own digital photographs for at least 1 of the 2 compositions, along with images appropriated from the Internet, or via the scanner. Students might shoot photos to fit or enhance their subject.
- Appropriated images should NOT include illustrations, animated characters or line drawings (we’re working with photographs).
- Ensure all of your source images are at least 1200 by 1600 pixels or larger, vertically or horizontally.
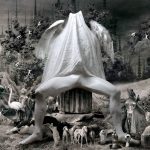
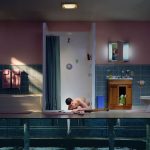
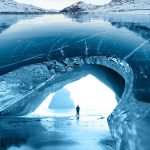
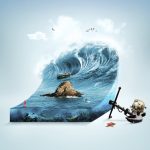
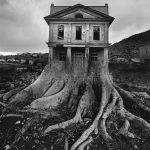
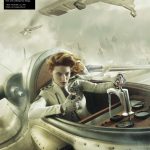
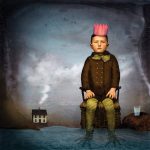
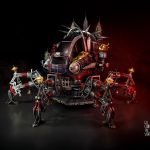
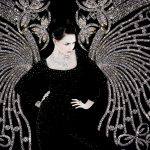
EXAMPLES OF COMPOSITE IMAGERY:


PROCEDURE
- Before starting your image, we will take time to answer some questions about your utopia and distopia. You will create 1 image of your Utopia, and 1 image of your Dystopia.
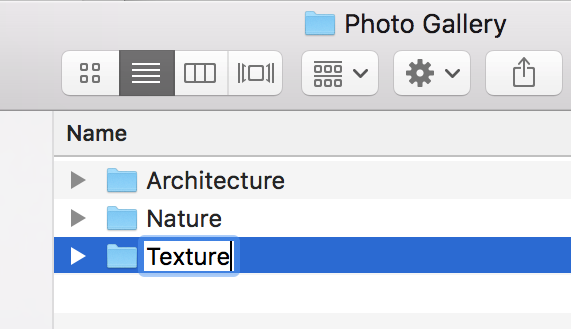
- You will start your image keeping the above questions/answers in mind. To begin your composite image, organize a pool of images to work with. In a finder window, navigate to your hard drive, and create three or more folders that will each become a category in your library of images. For example, name the first folder Architecture, the second Nature, the third Texture, and so on. Name any additional folders with topics of your choice, getting as specific as you like (people, animals, technology for example…)

- Collect your images with size and resolution in mind: All stock images should have at least one dimension that is no less than 1200 pixels in length. Bigger is not always better, so watch carefully for photographic quality, artifacting, color and sharpness.
- When you are appropriating images, consider content and context in addition to size and quality. Don’t settle for poor reproductions, even if the image seems to be the one you want. Look at the highlight and shadow quality, and zoom in to see if areas of color gradients are smooth.
- In Photoshop, create a new, blank canvas at 1200 x 1600 pixels at 72 ppi in RGB Mode, using square pixels, under Advanced, set the Color Profile to Adobe RGB 1998. You may work Horizontally or Vertically (1600 x 1200). The images you select might suggest the best starting orientation. But start with a white background in your new image. Save your new workspace right away, with a unique name. Then periodically, or every time you make an important edit, press Command-S to save again. Always believe that the power could go out at any moment!
- Now, select at least 3 images from your pool to work with: preferably one from a separate category of image content. Open all these images simultaneously in Photoshop. From the Window menu, select Arrange> Float All in Windows to split out the windows, so each image is in it’s own window outside of your new blank canvas. Important: be sure you open your stock images in Photoshop, not Preview.
- Use the Move tool (V) to drag and drop the three images into your new, blank workspace. You should be dragging images, not icons! Decide which image might provide an interesting base to build upon. Click directly on each image to select it, and then click and drag it into your new workspace. FYI: If an image will not let you drag and drop it, check Image>Mode, and make sure it is set to RGB. Perhaps start with the architecture in the background, then something organic on top of that.
- Transform the images to fit – Once the images are placed into your blank canvas as new layers, use the Free-Transform tool (command-T) to scale and rotate the images so they fit within the workspace in an interesting way. Zoom out (command –minus) and Zoom in (command +). Select different screen views (press F) to look at your work. Zoom out and turn off the menus (tab) to really see what you are doing.Reminder: hold down Shift as you drag a transform handle to keep an image in proportional scale, or lock it by clicking on the chain links in the option bar. Move your cursor just outside of the corner handle to get a rotate tool. Press Command as you drag a corner or edge to distort.
- FEATHERING EDGES TIP: To add a non-destructive feathered edges effect, select the desired layer mask on the Layers panel. Then, on the Properties panel, adjust the Feather slider as needed.
- Use the Move tool to arrange the Layers. Look for interesting overlaps and coincidences. If needed, go to the Layer Palette and change the order of the layers by dragging them up or down in the order. As well, adjust the opacity levels. For now, leave your background layer white or black (select and press command-I to invert) and locked in place.
- Using Non-Destructive methods (layer masks, smart filters, and adjustment layers), edit content out of each layer. Identify imagery that isn’t helping or doesn’t belong in the evolving composition. Instead of erasing or deleting (destructive editing methods), use layer masks to edit (hide/show) each individual layer. You will still have the flexibility to go forward and backward in time as you make creative decisions. To do this; First select the layer you want to work on by clicking on it once in the Layer Palette, then, click on the layer mask icon at the bottom of the layers palette (dark square with a small white circle in it). This will create a new blank Layer Mask for the Layer you are working on, identified by a white rectangle to the right of the Layer’s Image icon on the layer itself.IMPORTANT: Pay attention to whether you are working on the layer’s image, or on it’s layer mask! Notice how you can click to select the white rectangle (the mask), or you can select the image.Select the white rectangle representing the Layer Mask, and then select the paintbrush tool from the Tool menu (or press B). Use the paintbrush with black as your foreground color and paint directly in your image plane to conceal portions of the image, – use white to reveal. FYI: You will only be able to paint with black and white or gray when working on a Layer Mask. To choose a new value of gray, click on the foreground color swatch at the bottom of the Tool Palette. Notice the tiny icons next to the foreground and background color swatches that will allow you to reset to black and white, and to swap foreground for background colors (X on the keyboard).MORE TIPS:
Also try changing the paint brush opacity in the Option bar – 100% will erase or restore, lesser values will erase or restore partially, or translucently. Try turning on the air brush (also in the options bar) and setting softer brush edges. Remember – Black erases, white replaces — gray is in between. And be careful! You can also change your brush size by tapping the the right and left bracket keys; [ and ]. You can make the Layer Palette icons larger by going to Palette Options… in the Layer menu’s pull down menu in upper right corner, or, press Control to get the contextual menu.You may also use selections and black, gray or white to fill areas of the layer masks. Try the Polygonal Lasso tool or the rectangular or Elliptical Marquis tool to surround an area and then fill with black, white or gray. Try the Magic Wand (W) or Quick Select tool to select by color or value.
FYI: You can use a selection to start the Layer Mask as well. For example, you could use the Marquis tool to select a large area in a photograph. Make sure the layer you want to affect is selected, then click on the layer mask icon at the bottom of the Layers Palette. Or, with a Layer Mask already started, you can make additional selections on the Layer Image, then, select the Layer Mask icon on the layer and use Edit>Fill… to fill with black, white or gray.TIP: To see your Layer Mask, press Option and click on the Layer Mask icon. Click back on the image icon to return to the image. Also, you can press Control and click on the Layer Mask icon to get a menu that allows you to temporarily disable the Layer Mask. - Adjust your image and composition by continuing to move and/or scale or rotate each layer. Pay attention to the chain link icon between the Layer Image and it’s Layer Mask. Be careful – when the link is off, you can move the image within the mask’s window, or the Mask independently of the image.
- Experiment with Opacity and Blending Modes (the pull down menu at the top of the Layers Palette). Blending Modes change the way Layers interact with the Layers below. See what happens and what becomes accentuated or revealed by different combinations. Try to determine what is happening in each mode. Also try changing the layer order by clicking and dragging each layer up or down in the Layer stack, or, you can duplicate a Layer by pressing Option while clicking and dragging it up or down in the layer stack. Delete a Layer by selecting it and pressing delete or by clicking the trashcan icon at the bottom of the Layers Palette.
- Save each new, layered composition in Photoshop format (.psd) to your own storage media. When they are finished, you will submit the 2 finished .psd files on Canvas.
GRADING
2 points for each part of of the utopia questions (8 points total)
2 points for in-progress critique (participation and preparedness)
5 points each for finished composites (10 points total)